Table of Contents
ToggleAn outdoor kitchen frames the perfect backdrop for entertaining, cooking, and gathering outdoors. Whether it’s a simple grill station or a full-featured cooking space, the frame is the skeleton that holds everything together, literally. Unlike a typical patio setup, outdoor kitchen frames provide structure, durability, and the foundation for appliances, countertops, and storage. In 2026, builders and DIY enthusiasts have more material options and design flexibility than ever before. Understanding which frame type suits a project, how to prep the site properly, and what maintenance keeps it standing for decades makes the difference between a wobbly disappointment and a solid investment that adds real value to a home.
Key Takeaways
- Outdoor kitchen frames are load-bearing structural skeletons that hold appliances, countertops, and storage—proper framing prevents sagging counters, cracked stone, and uneven appliance placement.
- Material choice depends on climate: aluminum offers durability with minimal maintenance for most DIY projects, stainless steel suits coastal areas, and steel works in dry climates but requires regular rust prevention.
- Proper site preparation with level concrete pads, deep footings below the frost line, and square corner checks is essential to prevent twisted frames, water pooling, and settling issues.
- Aluminum outdoor kitchen frames need annual inspections for oxidation, while steel requires monthly rust checks in humid climates and stainless steel needs only routine cleaning and bolt maintenance.
- Budget for hidden costs including concrete footers ($3–$8 per linear foot), stainless fasteners, local permits, and tools—a basic 8-foot aluminum frame kit ranges from $800–$2,500 before installation.
What Are Outdoor Kitchen Frames and Why They Matter
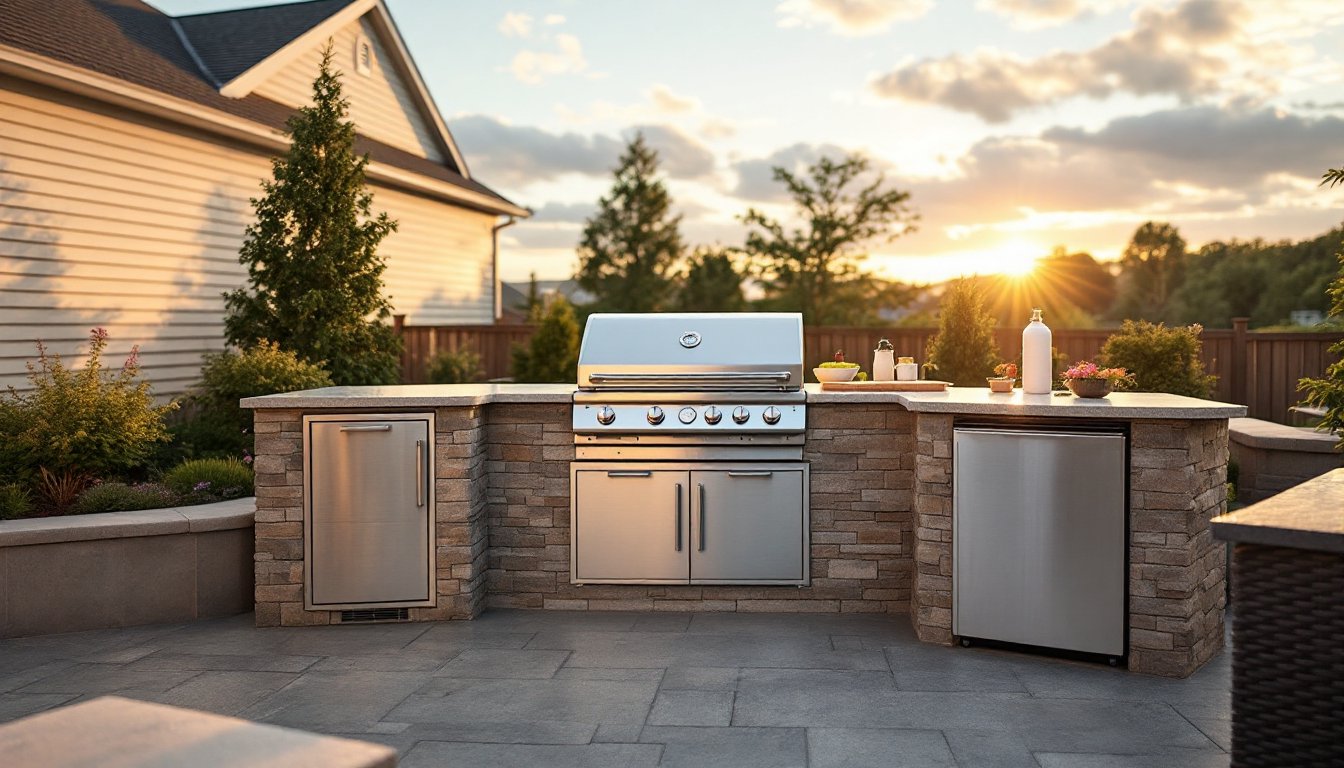
An outdoor kitchen frame is the structural skeleton, typically a combination of posts, beams, and connecting brackets, that holds up countertops, appliances, and storage cabinets. It’s not decoration: it’s load-bearing infrastructure. The frame carries the weight of a built-in grill (often 100–300 lbs), countertop materials, and weather exposure.
Builders often overlook frames because they focus on the visible appliances, but a weak frame leads to sagging countertops, cracked stone, and appliances that don’t sit level. A proper outdoor kitchen frame also provides mounting points for gas lines, electrical conduit, and water supply. It ties the whole system together and keeps everything functional through rain, wind, and sun.
Frames also define how modular or permanent your setup is. A steel-bolted frame can be reconfigured: a fully welded system is fixed. Understanding this distinction early prevents costly redesigns later.
Materials: Steel, Aluminum, and Stainless Steel Compared
Steel is affordable and strong but requires regular maintenance. Mild steel frames rust quickly in wet climates without primer and paint. A powder-coated finish extends life significantly, but touch-ups are necessary after years of exposure. Steel works well in dry climates where moisture isn’t constant.
Aluminum resists rust naturally and is lighter, making installation easier. It doesn’t require painting, though anodized finishes improve appearance and durability. The trade-off: aluminum isn’t as rigid as steel, so larger spans require thicker stock or more bracing. For most DIY projects under 8 feet wide, aluminum handles loads fine. It costs 20–40% more than steel but saves maintenance time.
Stainless steel (304 or 316 grade) is the premium choice. It won’t rust, requires minimal maintenance, and looks polished. The downside is cost, 3 to 4 times more than mild steel. It’s ideal for coastal properties or high-humidity areas where rust is a real problem. Stainless is overkill for dry climates but pays for itself in regions where salt spray or constant moisture are factors.
Most DIY builders choose aluminum for the balance of durability, ease of installation, and cost.
Design Styles and Layout Options for Modern Spaces
Modern outdoor kitchen frames fall into a few proven layouts: L-shaped, U-shaped, and linear (single run). L-shaped frames fit corner lots efficiently and create a defined work zone. U-shaped designs maximize counter space and are ideal for entertaining, though they require more area. Linear frames work on narrow patios and are the easiest to install.
Frame height matters. Standard kitchen counters are 36 inches, but outdoor kitchens often sit 32–36 inches depending on grill placement and user preference. Taller frames (38–40 inches) work for standing-height bars: lower frames are better for open-concept entertaining.
Contemporary designs use clean lines with minimal ornamentation. Industrial frames, exposed bolts, angle-iron supports, are popular in modern backyards. Transitional designs hide the frame under wood siding or outdoor-rated cabinetry, creating a finished look. Consider sightlines from the house: visible frames should match the home’s exterior style. Hidden frames can be bare metal as long as they’re protected from weather.
Door access is critical. Plan space for cabinet doors to swing open fully (18–24 inches clearance). If space is tight, consider roll-out drawers instead of swing doors.
Installation Essentials and Site Preparation
Site prep separates amateur projects from solid builds. Start by establishing a level surface, sloped ground means uneven countertops and water pooling. A concrete pad or compacted gravel base (4–6 inches) is standard. If building on existing concrete, check that it’s level and clean. Remove debris, moss, or algae with a pressure washer (1500–2000 PSI): let it dry fully.
Measure and mark the frame footprint with chalk or spray paint. Use a 4-3-5 right-angle check to confirm corners are square. This one step prevents twisted frames and binding doors.
Foundations matter. Concrete footers (12–18 inches deep, below frost line in cold climates) prevent frost heave and settling. Check local building codes, many jurisdictions require footers for permanent structures. A simple post-and-footing method works: dig holes, set posts in concrete, and bolt the frame to the posts. For temporary setups or portable frames, concrete deck blocks or adjustable leg levelers suffice.
Bolts and fasteners should be stainless steel or galvanized (never plain steel). Use washers to prevent bolt heads sinking into soft materials. Torque bolts snugly but don’t over-tighten aluminum, it strips easily. A socket wrench set and level are non-negotiable tools. Consider renting a concrete mixer if you’re pouring footers yourself.
Maintenance and Longevity Tips
Aluminum frames need annual inspection. Look for white oxidation (aluminum’s version of rust) and scuff marks where anodizing is worn. Light oxidation cleans off with white vinegar and a soft brush. If anodizing is damaged, touch up with clear sealant or automotive wax.
Steel frames require more attention. Inspect for rust spots monthly in humid climates. Address rust early with a wire brush and rust converter (which chemically stabilizes rust), then repaint with outdoor-rated enamel. Stainless steel rarely needs more than a wipe-down with mild soap and water, though fingerprints show easily on polished finishes.
All materials benefit from a routine once yearly: tighten bolts, check for standing water (a leading cause of rust and rot), and clean mineral deposits from water spray. In coastal areas, rinse the frame monthly with fresh water to remove salt.
Sealants on wood siding or trim should be reapplied every 2–3 years. Replace rubber gaskets around penetrations (where pipes or wiring enter the frame) if they crack or harden.
Weatherproofing isn’t optional. A coat of clear urethane or spar varnish on exposed wood-and-metal joints significantly extends life.
Budgeting and Cost Factors
A basic aluminum frame kit for an 8-foot linear kitchen runs $800–$2,500, depending on gauge (thicker = stronger and pricier) and whether it’s pre-welded or bolted. Stainless steel frames can reach $5,000+ for comparable size. Adding custom fabrication, local shipping, and tools pushes costs higher.
Hidden costs often surprise DIYers: concrete for footers ($3–$8 per linear foot), stainless fasteners ($1–$3 per bolt), and permits (varies wildly, $50 to $500+ depending on local codes). Some jurisdictions require engineered drawings or inspections for permanent outdoor structures.
Material prices fluctuate. As of early 2026, aluminum costs roughly 15–20% more than a year ago due to supply chain shifts. Steel remains stable but rust-prevention coatings add 10–15% to the base cost. Stainless prices are volatile and regional.
Labor is expensive if hiring professionals, typically $50–$150/hour for a skilled installer. A weekend DIY project might save $2,000–$4,000 in labor, but only if you have basic metalworking skills and tools.
Budget for tools if you don’t own them: a socket set, level, drill-driver, and measuring tape. Renting a drill press or band saw for custom cuts adds $50–$100 daily. Factor in sweat equity and time realistically before committing to DIY.
Conclusion
Building a solid outdoor kitchen frame requires planning, the right materials, and meticulous prep work. Choose your material based on climate and maintenance tolerance: aluminum for durability with minimal fuss, stainless for coastal areas, steel for dry climates with regular care. Proper footings and level ground prevent years of regret. Start with a clear budget, factor in permits and site work, and don’t rush the installation. A well-built frame supports appliances, resists weather, and keeps your outdoor kitchen functional for decades. Invest time upfront, and the frame will reward you every gathering season.